How To Activate GLO Sim | A Comprehensive Guide
I recently got a new Glo SIM card and I was excited to start using it, but I quickly realized that activating it wasn’t as straightforward as I expected. It felt frustrating not being able to make calls or use the internet immediately.
I understand that many of you might be facing the same issue, feeling stuck and unsure of what to do next. That’s why I’ve decided to share a simple, step-by-step guide on How To Activate GLO Sim efficiently. This guide is designed to help you overcome these initial hurdles and get connected as soon as possible.
How To Activate GLO Sim
SIM activation is key. It’s like unlocking the door to your phone’s features. Activating your Glo SIM means you’re set to make calls, send texts, and browse the internet. It’s crucial for staying connected with friends and family or for any urgent needs that might come up.
First Read This : How to Link NIN On Glo
Pre-Activation Checklist
Before you begin activating your Glo SIM, it’s crucial to ensure all the basics are in place. Here are the things you should check for a smooth start:
Purchase from a Nearby Glo Store
Buy your SIM from a trusted Glo store nearby. This ensures the SIM is genuine and you get proper guidance if needed.
Link with NIN
Ensure your SIM is linked with your National Identity Number (NIN). It’s a requirement for activation and helps in securing your identity.
Phone Compatibility
Confirm that your phone supports Glo services. Most modern phones do, but it’s always good to double-check.
Proper SIM Insertion
Insert the SIM carefully into your phone’s slot. It should fit snugly and match the shape of the slot.
Read Instructions
Review any instructions on the SIM package or leaflets. They might have important codes or steps for activation.
Taking these steps will prepare you well, making the activation of your Glo SIM easier and faster.
Step-by-Step Activation Process
Follow these simple steps to activate your Glo SIM:
- Insert the SIM Card
- Place your Glo SIM in your phone’s SIM slot correctly.
- Turn On Your Device
- Power on your phone and wait for it to recognize the Glo network.
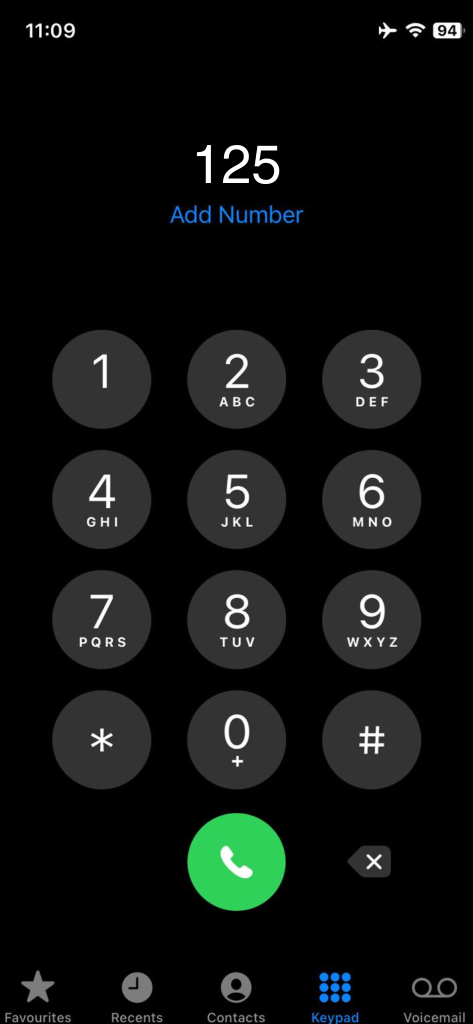
- Make the First dial code
- Open your phone’s dialler.
- Dial 125 to initiate the activation process.
Recharge Your Account Top up your Glo line with a minimum of N100 or more to ensure successful activation.
Note : Usually, you can find the activation code or how to use it on the package of your SIM card. Or, the person who sells you the SIM card can show you how to activate it. Remember to look for this information when you buy your new Glo SIM.
Troubleshooting Common Activation Issues
Sometimes, you might encounter problems during the activation process. Here’s how you can address common issues:
No Network Signal
- Ensure you’re in an area with Glo coverage.
- Restart your phone or try re-inserting the SIM card.
SIM Not Recognized
- Check if the SIM is inserted correctly.
- Try the SIM in another phone to confirm if the issue is with the SIM or your device.
Activation Code Not Working
- Double-check that you’ve entered the correct PIN from your SIM pack.
- Ensure you’re dialing the right code format,
Unable to Make Calls or Use Data
- Check your account balance to ensure you have enough credit.
- Verify that your data and call settings are correctly configured.
Contacting Support
- If problems persist, contact Glo’s customer support.
- Have your SIM details and a description of the issue ready to speed up the process.
Addressing these common issues should help you resolve most problems encountered during the Glo SIM activation process.
Conclusion
Getting my Glo SIM activated wasn’t as tricky as I first thought. By following the straightforward steps and being prepared with a bit of troubleshooting, I managed to get my phone connected without too much hassle.
Start by ensuring your phone is compatible, your SIM is properly inserted, and everything is set for activation. If you bump into any issues, don’t worry, the solutions are usually simple, like checking your network settings or contacting Glo’s helpful customer support.
Now, with my Glo SIM activated, I’m all set to enjoy making calls, sending texts, and browsing the internet. Hopefully, this guide makes your SIM activation journey just as smooth!
FAQs
How can I confirm that my Glo SIM has been successfully activated?
You can confirm activation by noticing network signals on your phone. Try making a call or sending an SMS. If it goes through, your SIM is active. You may also receive a welcome message from Glo confirming your activation.
What should I do if I encounter problems during the activation process?
If you face issues, double-check that you’ve followed all the steps correctly. Ensure your SIM is properly inserted, and your phone is compatible. If problems persist, contact Glo’s customer support for personalized assistance.
Why do I need to link my NIN with my Glo SIM?
Linking your NIN with your Glo SIM is a regulatory requirement. It helps in verifying your identity and ensures the security and authenticity of your mobile subscription. Make sure you have your NIN ready during the activation process.